
Techline Connect brings together all the common resources technicians use every day for diagnosis and repairs in an all-in-one application. The all-new application has a single sign-on for access to nine applications — integrating Service Information, reprogramming, diagnostics, vehicle information and other features — to help technicians efficiently and accurately manage the information available to them in the service department. (Fig. 1)
TIP: As Techline Connect is the replacement for TIS2Web, GM recently announced a wind down phase that includes no additional updates for TIS2Web. The wind down of TIS2Web will be in a 60-day multi-phased window. More information about the wind down process will be released soon.
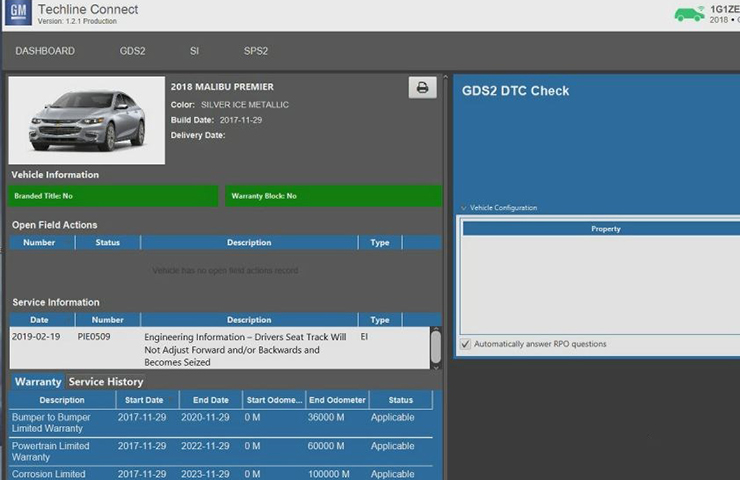 Fig. 1
To help technicians get the most out of Techline Connect (TLC), here are a few tips about some of the key features of the application.
Logging In to Techline Connect
Before getting started, ensure your GlobalConnect credentials are valid. To verify, simply log in to GlobalConnect. If you cannot log in, check with your dealership’s Partner Security Coordinator (PSC).
Like TIS2Web, installation of Techline Connect requires the use of Administrative Rights. During installation, if the PC doesn’t have the correct rights, the user will most likely be unable to perform completion of the installation.
Once installation has completed, it may be necessary to update your location and language. From the log-in screen, select the Preference tab at the top right of the page to change your selections.
The Quick Start Guide provides additional details, including screen shots to help ensure a successful installation the first time through.
Access Through the Techline Connect Icon
Once Techline Connect has been installed on the PC, a Techline Connect icon will be placed on the desktop that will allow direct access to the application without having to log in to GlobalConnect.
Select VCI Device
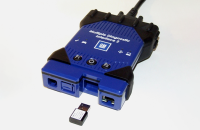
To display any connected MDI tools (USB connection) or MDI tools that are wirelessly connected and active, click the Select VCI Device button at the top of the Techline Connect dashboard. (Fig. 2)
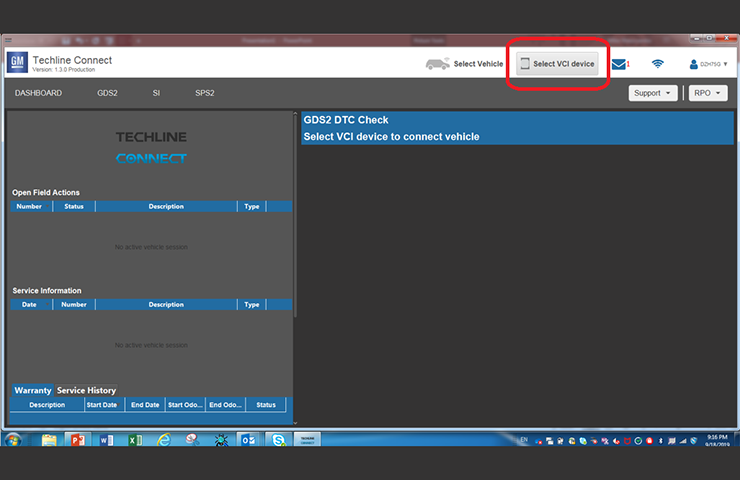 Fig. 2
Selecting an MDI tool will establish the MDI connection and attempt to establish a vehicle connection, retrieving the VIN. (Fig. 3)
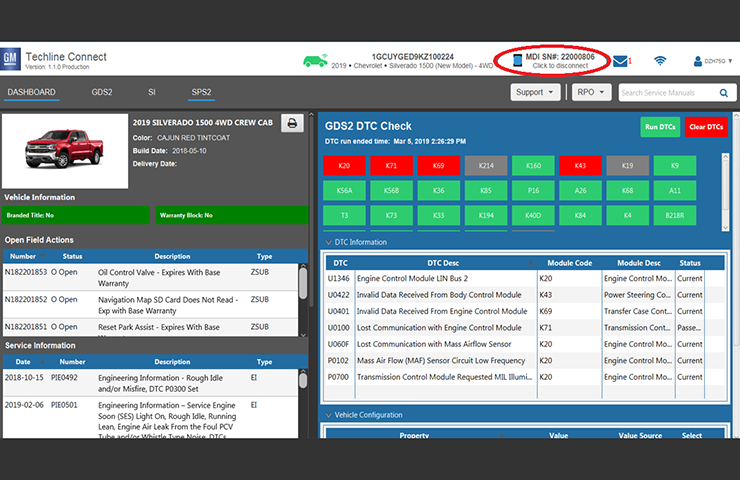 Fig. 3
Select Vehicle
Always start by clicking the Select Vehicle button at the top of the dashboard. From here, you can:
- Select Connect Vehicle to use the VCI device to read the VIN directly from the connected vehicle (Fig. 4)
- Or type in a VIN or copy and paste a VIN
- Select a Year/Make/Model
- Select a previous search from history
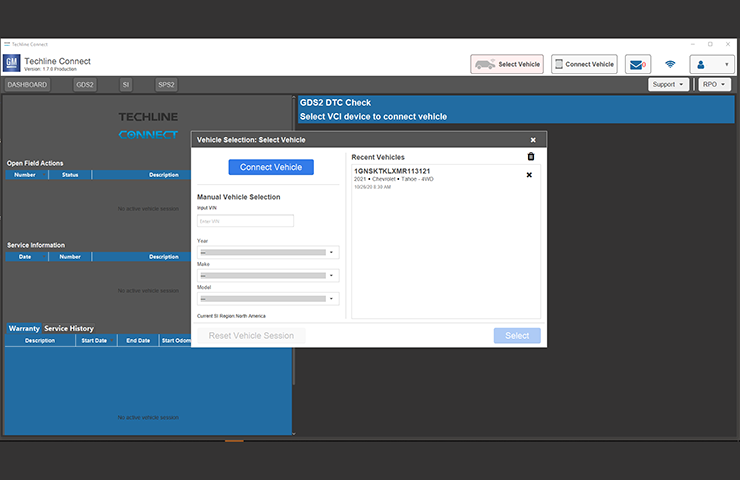 Fig. 4
Searching the Service Information
After entering a VIN or selecting Year/Make/Model from the Select Vehicle function, select the Service Information (SI) application at the top of the dashboard to begin using the Service Information. The VIN and year/make/model will be populated automatically. Enter a keyword or phrase in the quick search field at the top of the dashboard and Techline Connect automatically performs an SI search for the connected vehicle. (Fig. 5)
If you’d like to perform another SI search not related to the connected vehicle while still maintaining the connection on the dashboard, select the Search Another Vehicle option under the SI menu.
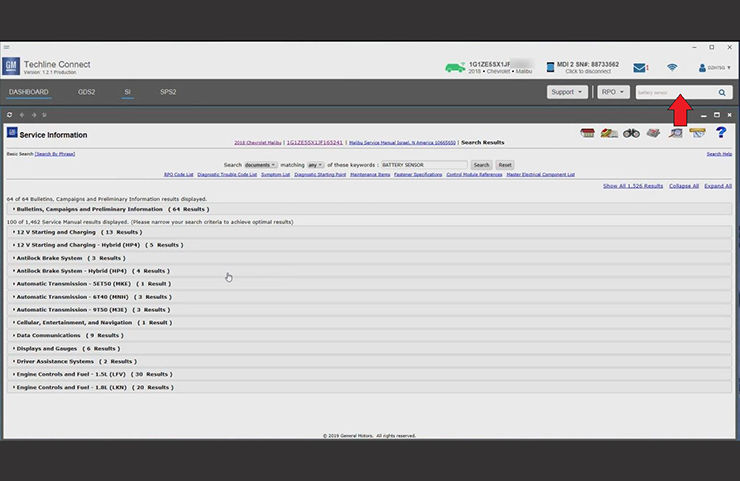 Fig. 5
To view the printing options in SI, right-click in any panel to access the print dialog box. The SI page will open in the default browser to print. If viewing an image in SI, use the Print button available in the image viewer. Plug-ins are no longer needed when viewing SI using Techline Connect.
DTC Check
Use the GDS2 app to perform a vehicle-wide DTC scan from the Techline Connect dashboard. This feature is only available to use on vehicles with a global electrical architecture – Global A and Vehicle Intelligence Platform (VIP) vehicles. Vehicles that use all other protocols (GMLAN, Class II) require the Tech 2.
In order to use the GDS 2 DTC check, an active MDI/VCI and vehicle connection is required.
The DTC check will report communication with vehicle control modules and any DTCs detected. (Fig. 6)
- A green box indicates successful communication with the module but no DTCs.
- A red box indicates successful communication with the module and that DTCs were detected. Select each red box to view the related DTCs.
- A grey box indicates no communication with the module, which can mean that the module does not exist on the vehicle or that the module is not responding.
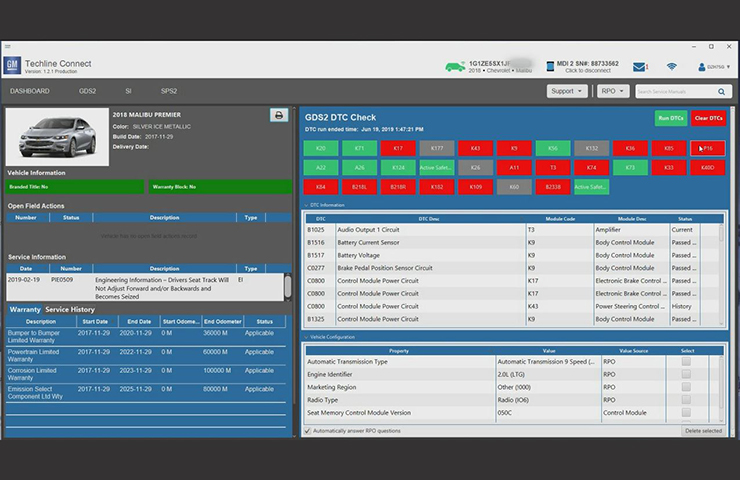 Fig. 6
Clearing All DTCs
After programming using the SPS2 application, some vehicle architectures support a ‘quick clear’ of DTCs from the SPS2 warranty claim screen, which should quickly remove any programming-related DTCs. However, some DTCs may remain after programming. Go to the Techline Connect dashboard and use GDS2 to clear all DTCs vehicle-wide if the situation calls for a thorough clear.
Using GDS2 During a Test Drive (Standalone)
The Standalone sign out option under the Profile menu allows you to log out of Techline Connect (no connection to the Service Information and SPS) but still use GDS2 diagnostics during a test drive. (Fig. 7)
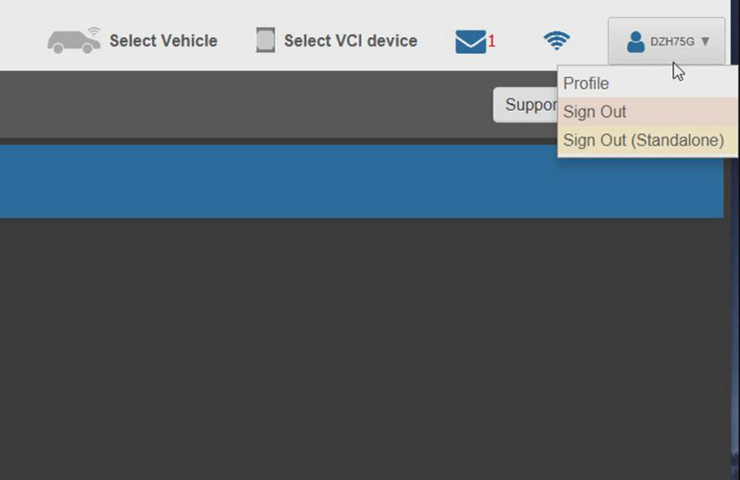 Fig. 7
Standalone also can be accessed from the log-in page. Enter log-in information as normal and click the Enter Standalone Mode button. (Fig. 8)
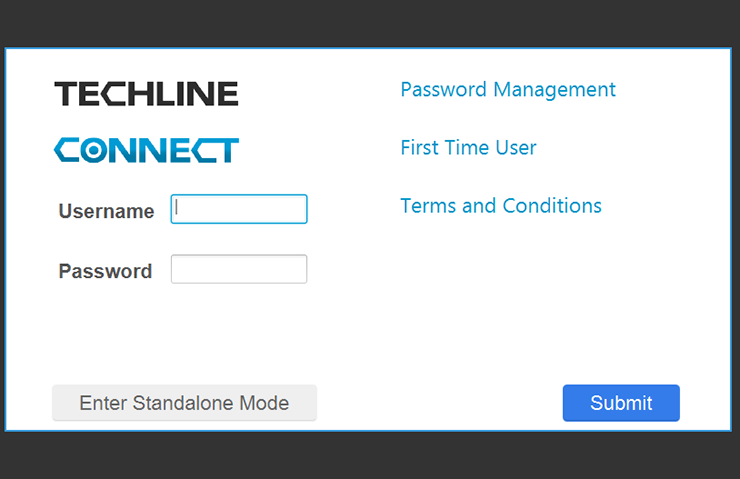 Fig. 8
Panel Management
The multi panel view function allows up to four panels to be shown on the screen at one time (Fig. 9), which can be helpful, for example, when using GDS2 while viewing diagnostic information and a schematic in SI. Right-click on a link and select Open in a New Page to open it in a new panel. Click and drag the top of the panel to move its location or grab the border to resize the window.
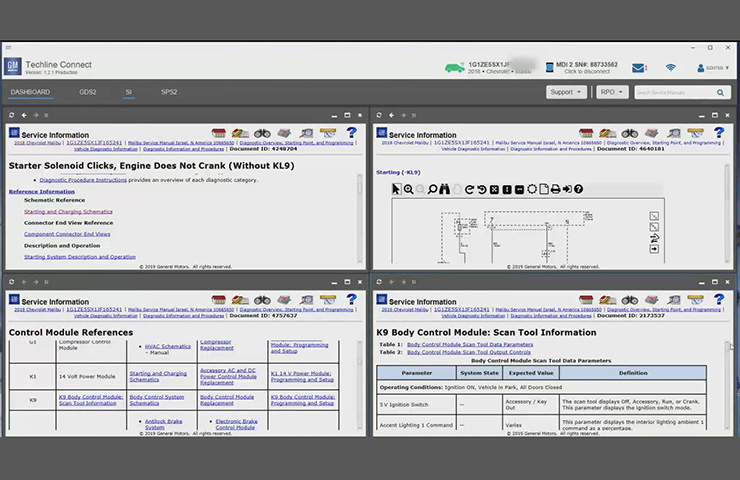 Fig. 9
To enable the multi panel view function, go to the Profile section under the User I.D. menu at the top right of the dashboard and select the desired screen mode. (Fig. 10) If the maximum number of panels are currently in use when opening a new panel or application, Techline Connect will ask which panel to replace with the new panel or app. Also, any panel can be selected to be viewed full screen. Click the X at the top of each panel to close it.
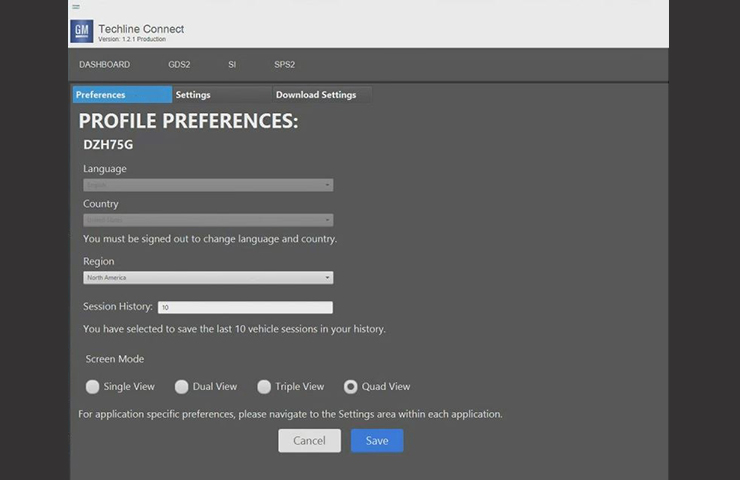 Fig. 10
Screen Resolution for Larger Monitors
Change the screen resolution based on the size of the monitor being used to make it easier to view and use the apps. The resolution can be changed on the PC under the display settings. Right click on the desktop to access the settings.
The scale of applications also can be made larger or smaller from the Windows display settings. Under Scale and Layout, text in all apps, including Techline Connect, can be made larger by increasing the scale.
Application Updates
The new Update Manager that is part of Techline Connect will perform all updates needed to keep the applications up to date when logging in to Techline Connect, including GDS 2 and MDI updates and large calibration files (if configured in the Profile Preferences). To ensure all updates are downloaded properly, make sure your dealership’s IT department correctly configures all of the Techline PC’s security settings. (Fig. 11)
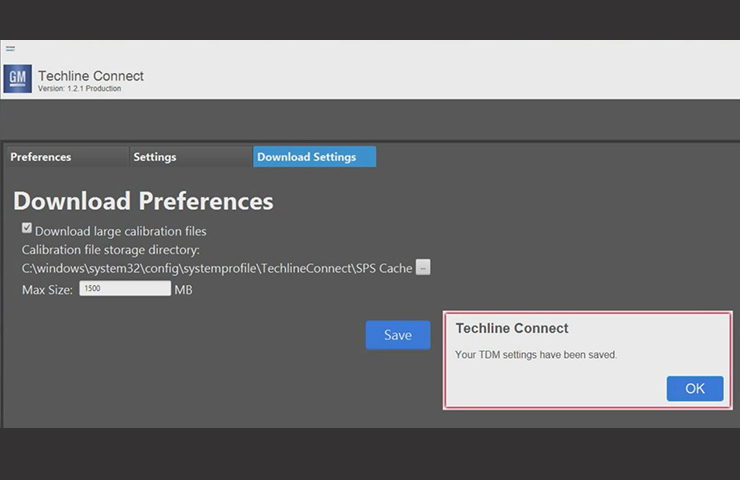 Fig. 11
If the PC’s security settings do not allow updates to occur or be seen by the user, Techline Connect will continue the log in process. As a result, the app may not be up to date at all times. If a core update for Techline Connect is not made, it will affect all of the component apps.
TIP: Many dealership networks have elevated administrative rights. If Techline Connect on your PC is not getting updates, try to Run as Admin.
To Run as Admin:
- Right-click the Techline Connect icon, and then select Properties.
- In the Shortcut tab, click the Advanced button.
- Click the check box ‘Run as Administrator.’
- Click OK, and then Apply.
These settings will run Techline Connect as an administrator by default.
Updates for Techline Connect are typically released on weekends. If an app works on Friday, but does not on Monday, it may be due to the PC security settings not allowing the update.
Check the Messages box at the top of the Techline Connect dashboard to see if an update has been released and should have been downloaded. A message will be sent out when all updates are released. If the download did not occur, it may be necessary to contact your dealership’s IT department or the Techline Customer Support Center.
Questions?
The mail icon at the top of the Techline Connect dashboard can be used to send an email to the Techline Customer Support Center (TCSC) with any questions about an application.
– Thanks to Lisa Scott and Nate O’Rourke


GDS2 does not have a printing feature, but it does output reports in HTML format. DTC and EPID lists may be printed out using the web browser after an HTML report is generated via the Create Report button on GDS2, if available. Most tests have the Create Report button enabled. If the header info, etc. isn’t needed, simply copy and paste the data from the HTML file to another editor app.
In SI, right-click in the window and select the Print option in order to print the currently displayed information. A browser window will open with a print dialog box.
How can I print the DTC’s as with the small Service Information screen I still need to log into SI using global connect. Also a printed copy is nice for warranty claims paperwork.
I have had problems recently when I select SI it says I’m not authorized to view it
The Techline Connect IT development team is working to address both issues. We will soon be implementing a new ‘web browser’ into TLC’s service information. It should improve graphic load times and fix many printing issues. The development team is also working on fixing the SPS warranty claim code print screen to ensure a correct print, no matter the format.
unable to print si docs on techline connect
can print warr codes after reflash on sps on tecline connect
With all the negative comments posted, I thought I would chime in with a positive note. I have been using Techline Connect since its birth. Many updates and improvements have been made. Communication about issues being addressed thru emails, alerts and lately on Emerging Issues are appreciated. One example of flat rate is using GDS2 to retrieve a dtc on the vehicle being worked on. Then in the same instance, research the dtc. And if I need to look for rpo’s, its there on the drop down. All the warranty information is also on the dashboard. To me that is a progress. Thank you Lisa and Nate.
Tried using this when it first came out as well. Not only is the text on documents and schematics too small in Si, when trying to graph data on gds2 it is even harder to see now and the graphs are smaller and harder to accurately read. Even with a 32″ monitor. Not looking forward to this…if it’s not broke, why fix it?
Sure hope we are not forced to use it. As if the schematics were not small enough already on Si, now the screen is even smaller being inside of the tech connect screen…
Hi Steven, we’re sorry there’s an issue in the current installer and how it interacts with the MDI manager software. TLC is designed to update all GM diagnostic applications, such as Tech2Win and the MDI manager. The problem is, the MDI manager works on a ‘toggle’. When the MDI manager installer is run, if the MDI manager isn’t present, it will install. If the MDI manager is already present… it uninstalls it. We are currently testing a fix and it should be available shortly.
Tech2Win and other ‘legacy’ diagnostic tools will be directly updated by running TLC. Tech2Win configuration can be launched by TLC using the ‘Support’ tab, as well as update its security/software download. The diagnostic data bus tool will also be updated and can be launched from the Windows Start Menu.
I’ll email you more directly to help provide any technical support you may need.
Nate
Techline Connect Support Team
When this programm first came out a while ago i really disliked it, was not working good at all. So i stopped using it. But now, since TiS2web will be discontinued, unfortunetly, when i try to re-install the programm, it keeps telling me that MDI Software is missing. It is not, evry time i try the TLC install, it deletes MDI Manager. Not looking foward to be forced to use this programm. Also, how will we be able to update Tech2 Win when it Expires if TIS is gone?
I tried it months ago and deleted because it was to hard to see the smaller windows and I couldn’t break up to multiple screens that I currently use. but I guess Im going to be forced to use an inferior product after all