
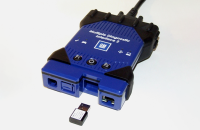
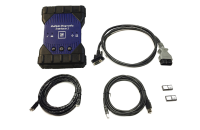
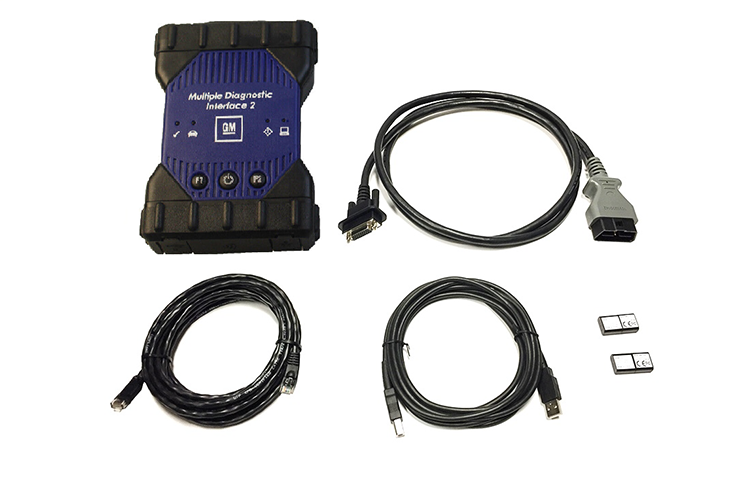
There are several possible methods – both wired and wireless – to connect with the MDI 2 (EL-52100). (Fig. 8) Which is best for you depends on typical use of the tool and the dealership environment.
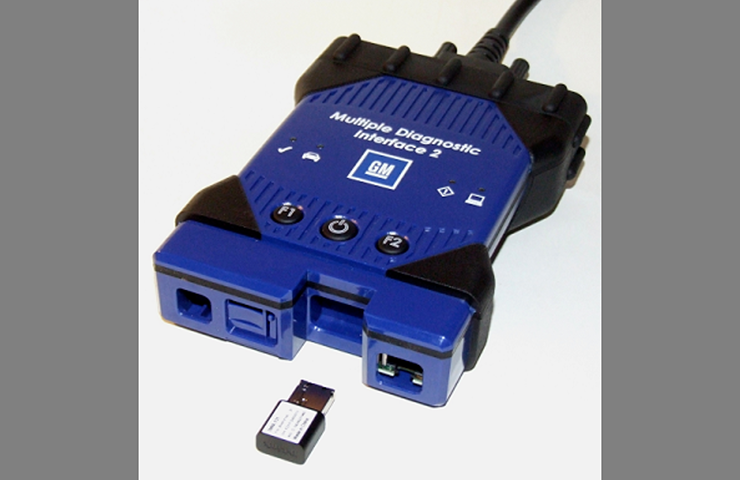 Fig. 8
Although wireless provides a flexible connection for technicians, it’s also the least reliable method of connection due to possible interference issues that can be experienced in the shop environment.
USB and ethernet cables are two methods that can be used for a hardwired connection with the MDI 2. Keep in mind that GM only supports the original 10-foot (3-meter) USB cable that comes with the MDI 2 kit. The cable (EL-52100-2) can be purchased separately from GM Dealer Equipment. Aftermarket cables, cables longer than 10 feet (3 meters), repeater cables or USB hubs are not supported. If a hardwired connection longer than 10 feet (3 meters) is required, GM recommends setting up an ethernet connection instead as it supports lengthy cable runs of several hundred feet or more.
Here’s a closer look at each option and how to set up each connection.
WIRELESS CONNECTIONS
A wireless connection allows the MDI 2 to be used without a physical connection to the PC. However, users will have a more consistent and reliable experience with hardwired connections. Point-to-Point wireless is recommended over Access Point wireless if a user wishes to use a wireless connection.
Point-to-Point Wireless Setup
The Point-to-Point connection establishes a private wireless connection between the MDI 2 and the PC and allows the PC and MDI 2 to be moved outside the range of the shop’s wireless network. (Fig. 9)
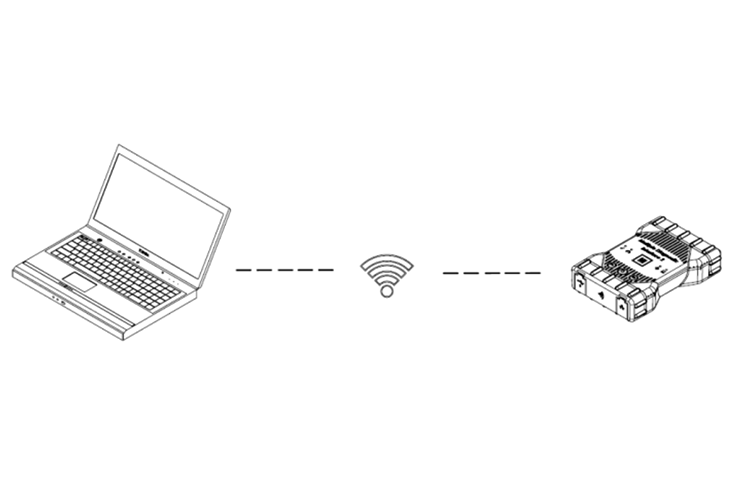 Fig. 9
A Point-to-Point setup only needs to be performed if the MDI 2 has never been connected to the PC being used. If Point-to-Point configuration is needed, a yellow triangle icon will appear over the MDI 2 in the MDI Manager application.
Configuring/Pairing a Point-to-Point Connection
- Plug a supported wireless 802.11 dongle (EL-52100-4) into the PC. (Fig. 10)
- Start the MDI Manager software by clicking the MDI Manager icon.
- Plug the USB cable into the PC and the MDI 2.
- Wait for the MDI 2 to appear in the Explorer window.
- Unplug the USB cable. The device icon should change from USB to Wireless.
- Click Connect to confirm the wireless connection.
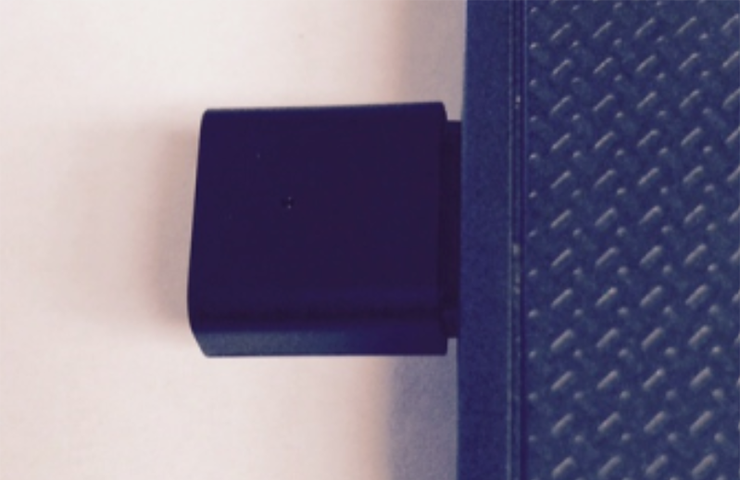 Fig. 10
TIP: In the MDI Manager Network Setup tab, the IP Address Configuration applies only to Access Point wireless. It does not apply to Point-to-Point wireless.
Access Point Wireless Setup
An Access Point connection establishes a shared wireless connection between the MDI 2 and PC. The connection is limited to the range of the shop’s wireless network. (Fig. 11)
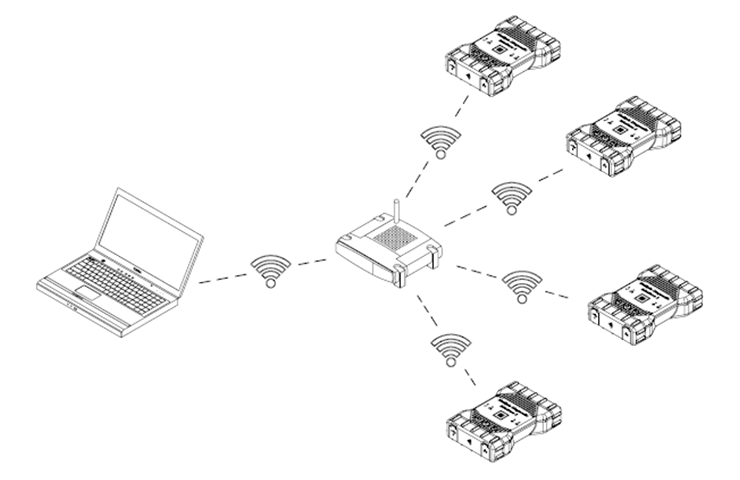 Fig. 11
Configuring an MDI 2 for an Access Point connection is typically done by a network administrator in the dealership. Before modifying the MDI 2 communications interface, contact your IT Administrator if you are not comfortable performing the procedure, or if you need assistance with any of the following items.
- Does the dealership LAN automatically assign IP addresses? If not, you will need an IP Address and Subnet Mask to assign to your tester.
- Wireless communication access point SSID (network name)
- Required network authentication is WPA2
- Required data encryption is TKIP or WEP (64-bit or 128-bit)
- Wireless security password (encryption key)
Configuring an Access Point connection
- Start the MDI Manager software by clicking the MDI Manager icon.
- Plug the USB cable into the PC and the MDI 2.
- Power on the tester via the self-test adapter or by connecting to the vehicle Data Link Connector.
- Select and connect to the MDI 2 in the MDI Explorer tab of the MDI Manager.
- Select the Network Setup tab. If 12 volts is not detected, the MDI Manager will display the message “External power is required.”
- Select the Wireless tab.
- Select the Enable Wireless Interface check box in the Interface Control box to enable the interface. Once the interface is enabled, the IP Address Configuration box and the Apply and Cancel buttons become active.
- Select Obtain an IP Address Automatically if your LAN automatically assigns IP addresses. Otherwise, enter the assigned IP Address and Subnet mask.
- Select Access Point to begin wireless access point configuration.
- If not within range of the access point, or if the access point is not broadcasting its SSID, select the Enter Network Name [SSID] radio button and type the network name.
- If within range of the wireless access point, choose the Select from Available Network List radio button. The list will be automatically updated, and the software will search for wireless network signals. The detected networks are displayed in the Network Name box.
- After entering the network name, select Configure.
- Enter the security setting required by your network, and then select Next.
- Select Yes to re-configure your MDI 2 or select No if you want to start over.
- Select OK. MDI 2 Configuration in Process will flash during the update process. MDI 2 Interface Changes Complete will be displayed briefly when the update process is finished.
- Your MDI Manager will automatically save the last ten wireless configurations that have been used for Access Point communication.
- Do not unplug the MDI 2 from the PC or remove power from the MDI 2 during the update process; otherwise, the MDI 2 will have to be recovered.
- After the update process is complete, select the Properties tab to verify that the MDI 2 is configured correctly.
- Record or print your settings as they are displayed on the Properties tab for future reference.
The MDI 2 is now configured for use when connected to any PC where MDI Manager software has been installed. Installing the MDI Manager software installs certain utilities that are required for Techline Connect to use the MDI 2. It is not necessary to start the MDI Manager software before using Techline Connect.
WIRED ETHERNET CONNECTION
Configuring an MDI 2 for a wired ethernet connection is typically done by a network administrator in the dealership. Before modifying the MDI 2 communications interface, contact your IT Administrator if you are not comfortable performing the procedure, or if you need assistance with any of the following items.
- Does the dealership LAN automatically assign IP addresses? If not, you will need an IP Address and Subnet Mask to assign to your MDI 2.
Configuring a Wired Ethernet Connection
- Plug the USB cable into the PC and the MDI 2.
- Apply 12 volts to the tester via the self-test adapter or by connecting to the vehicle Data Link Connector.
- Start the MDI Manager software by clicking the MDI Manager icon.
- On the MDI Explorer tab, select the MDI 2 and click the Connect button. A check mark appears over the MDI 2 icon to indicate that the connection has been made.
- Select the Network Setup tab.
- Select the Wired Ethernet tab.
- Select the Enable Wired Ethernet Interface check box in the Interface Control box to enable the interface. Once the interface is enabled, the IP Address Configuration box and the Apply and Cancel buttons become active.
- The MDI Manager software will store the changes made for each interface. You can select the other interface, make additional changes, and then apply all changes to both interfaces at once by clicking the Apply button. Start over at any time selecting Cancel, which discards all changes before they are recorded.
- Select Obtain an IP Address Automatically if your LAN automatically assigns IP addresses. Otherwise, enter the assigned IP Address and Subnet mask.
- Select Apply to reconfigure the MDI Manager. Use the screen at the right to check your communication changes.
- Select Yes to continue or No to go back to the Network Setup tab to make any changes.
- Select OK. MDI 2 Configuration in Process will flash during the update process. MDI 2 interface changes complete will be displayed briefly when the update process is finished.
- Do not unplug the MDI 2 from the PC or remove power from the MDI 2 during the update process; otherwise, the MDI 2 will have to be recovered.
- After the update process is complete, select the Properties tab to verify that the MDI 2 is configured correctly.
- Record or print your settings as they are displayed on the Properties tab for future reference.
WIRED OR WIRELESS?
Pros and Cons to Consider
There are several pros and cons of each type of connection to consider when setting up the MDI 2. (Fig. 12) Many considerations are impacted by how and where the MDI 2 is used.
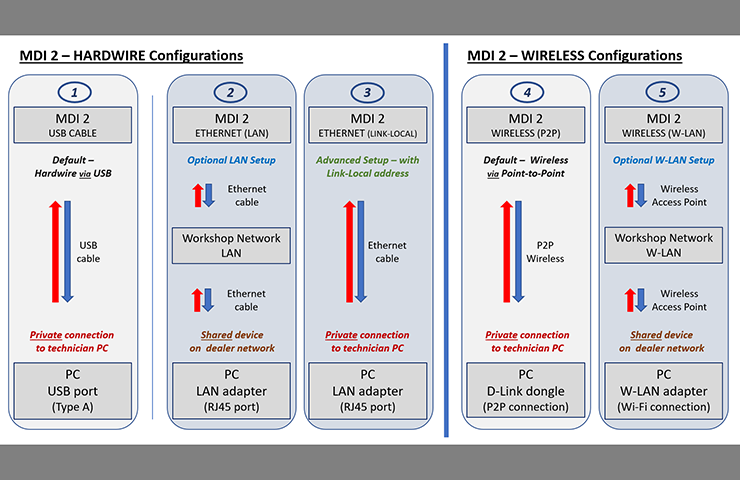 Fig. 12
- USB Cable – Recommended for troubleshooting
PROS
- Simple, easy default method of connection to MDI 2.
- Hardwired reliability (USB cable).
- ‘Direct to PC’ connection permits testing outside boundaries of shop networks (essential for road testing).
- ‘Private’ connection minimizes interference for higher reliability.
CONS
- Movement is restricted by the USB cable length (10 ft.).
- Cables are susceptible to wear and damage.
- ETHERNET (LAN)
PROS
- ‘Shared’ connection permits MDI 2 to be available to multiple PCs across the shop network.
- Hardwired reliability (ethernet cable).
- Greater distance; ethernet cable length can be several hundred feet.
CONS
- Unable to support on road testing.
- Setup is more complex and may require IT assistance.
- Shop network adds complexity; potential for network traffic interference and additional points of failure.
- Complexity makes troubleshooting difficult; TCSC is limited in diagnosis and often requires dealership IT engagement regarding the network.
- Cables are susceptible to wear and damage.
- ETHERNET (LINK-LOCAL Address)
PROS
- Hardwired reliability (ethernet cable).
- ‘Direct to PC’ connection permits testing outside boundaries of shop networks (essential for road testing).
- ‘Private’ connection minimizes interference for high reliability.
- Greater distance; ethernet cable length can be several hundred feet.
CONS
- Secondary network adapter may be required (USB-to-ethernet adapter may be needed).
- Setup is more complex and may require IT assistance.
- WIRELESS (P2P)
PROS
- Relatively simple and preconfigured for easy set up.
- Wireless convenience for cable-free movement.
- ‘Direct to PC’ connection permits testing outside boundaries of shop networks (essential for road testing).
- No cables to be concerned about for wear or damage caused by harsh shop environment.
CONS
- Movement and reliability restricted by wireless range.
- Potential to be exposed and affected by Wi-Fi interference.
- WIRELESS (W-LAN)
PROS
- ‘Shared’ connection permits MDI 2 to be available to multiple PCs across the shop network.
- Wireless convenience for cable-free movement.
- No cabling to be concerned about for wear or damage caused by harsh shop environment.
CONS
- Unable to support on road testing.
- Setup is more complex and may require IT assistance.
- Workshop network adds complexity; potential for network traffic interference and additional points of failure.
- Complexity makes troubleshooting difficult; TCSC is limited in diagnosis and often requires dealership IT engagement regarding the network.
- Movement and reliability restricted by wireless range.
- Potential to be exposed and affected by Wi-Fi interference.
– Thanks to Chris Henley


A supported wireless dongle is the dongle that comes with the MDI 2. Replacements can be ordered through GM Dealer Equipment.
It would be great to have more info on what a “a supported wireless 802.11 dongle (EL-52100-4) ” means. Technicians buy their own tools, and the dealer account isn’t easy to access when something wears out. Buying a pair of DWA-131 dongles locally didn’t work for me.
HAY CHAD I FOUND THIS BUY TYPING LAN IN THE SEARCH BAR. IN TECHLINK HOPE IT HELPS I AM MOVING ON TO THE NEXT Q#
LAN Switching is a feature in Windows used to define how network interface adapters (ethernet or wireless) are to operate. (Fig. 15) Disabling this setting in BIOS tells the PC not to disable one network (ethernet or wireless) when another network is detected. Using the internet browser, search your PC Make and Model for the function key to enter BIOS during the PC boot.
There is zero mention of LAN switching in this article. The Q# test sends us here for an answer thats not here.
GM is considering the current wireless environment and its challenges while evaluating the next generation scan tool.
GM needs to enable 5ghz support on the MDI2s. Theres far too much interference in a 40 bay shop with existing dealership devices and every onstar equipped vehicle broadcasting. Enabling 5ghz would make for a less cluttered wifi environment with a lot less interference.