
A wind noise condition or a water leak at the front of the roof or top of the windshield may be found on some 2014-2019 ATS and CTS models. If the water leak is present, water may run down the interior A-pillar to the front floor footwell.
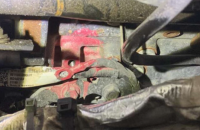
The wind noise or water leak may be due to pinholes, cracks or voids in the forward roof ditch laser braze area (Fig. 6), the upper windshield flange seam, or lower corners of the windshield opening. (Fig. 7)
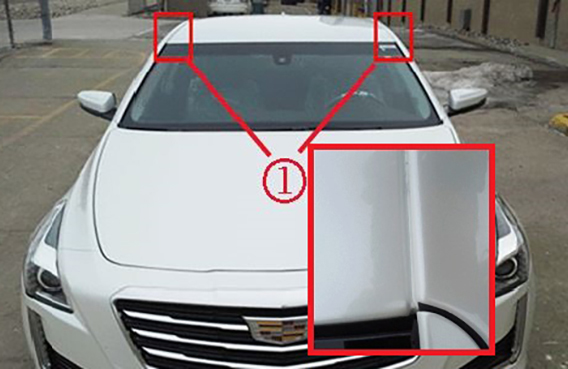 Fig. 6
 Fig. 7
Forward Laser Braze Area Sealing
Inspect the forward laser braze area and water test the roof ditch and upper windshield area on the affected side of the vehicle.
Begin with a clean and dry front laser braze area. Remove the windshield garnish molding and perform a water leak test on the forward laser braze and upper windshield area using a water hose without a nozzle attached. (Fig. 8)
 Fig. 8
Flood the area for up to five minutes while observing the interior A-pillar for any evidence of water running along the pillar. (Fig. 9)
 Fig. 9
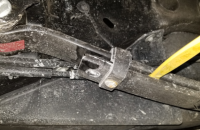
If a water leak is detected, inspect the roof laser braze for any pinholes or cracks. (Fig. 10) The small pinholes or cracks may be more difficult to see on darker color finishes.
 Fig. 10
Seal any holes or cracks using Kent Automotive High-Tech Seam Sealer or equivalent with the proper touch-up paint color. Avoid any build-up of seam sealer within the ditch. Wipe away any excess sealer with a light amount of solvent on a shop rag or paper towel. The solvent will help the sealer flow into the hole or crack. Water test the repaired area again and inspect the interior A-pillar for any visible water leak.
Windshield Sealing
If a water leak is still present after sealing the roof laser braze area, remove the windshield.
TIP: When removing the windshield, the tether clip at the lower portion of the garnish molding is not reusable and must be replaced every time the molding is removed.
On the affected side, check the upper windshield flange seam at the end of the laser braze (Fig. 11, #1) as well as the lower corner flange seam for any signs of pin holes, voids or cracks. (Fig. 11, #2) Seal any holes or seams as needed following the sealing procedure and reinstall the windshield.
 Fig. 11
Refer to Bulletin #18-NA-362 for additional information and part numbers.
– Thanks to Megan Brobeck


